Love In An Elevator

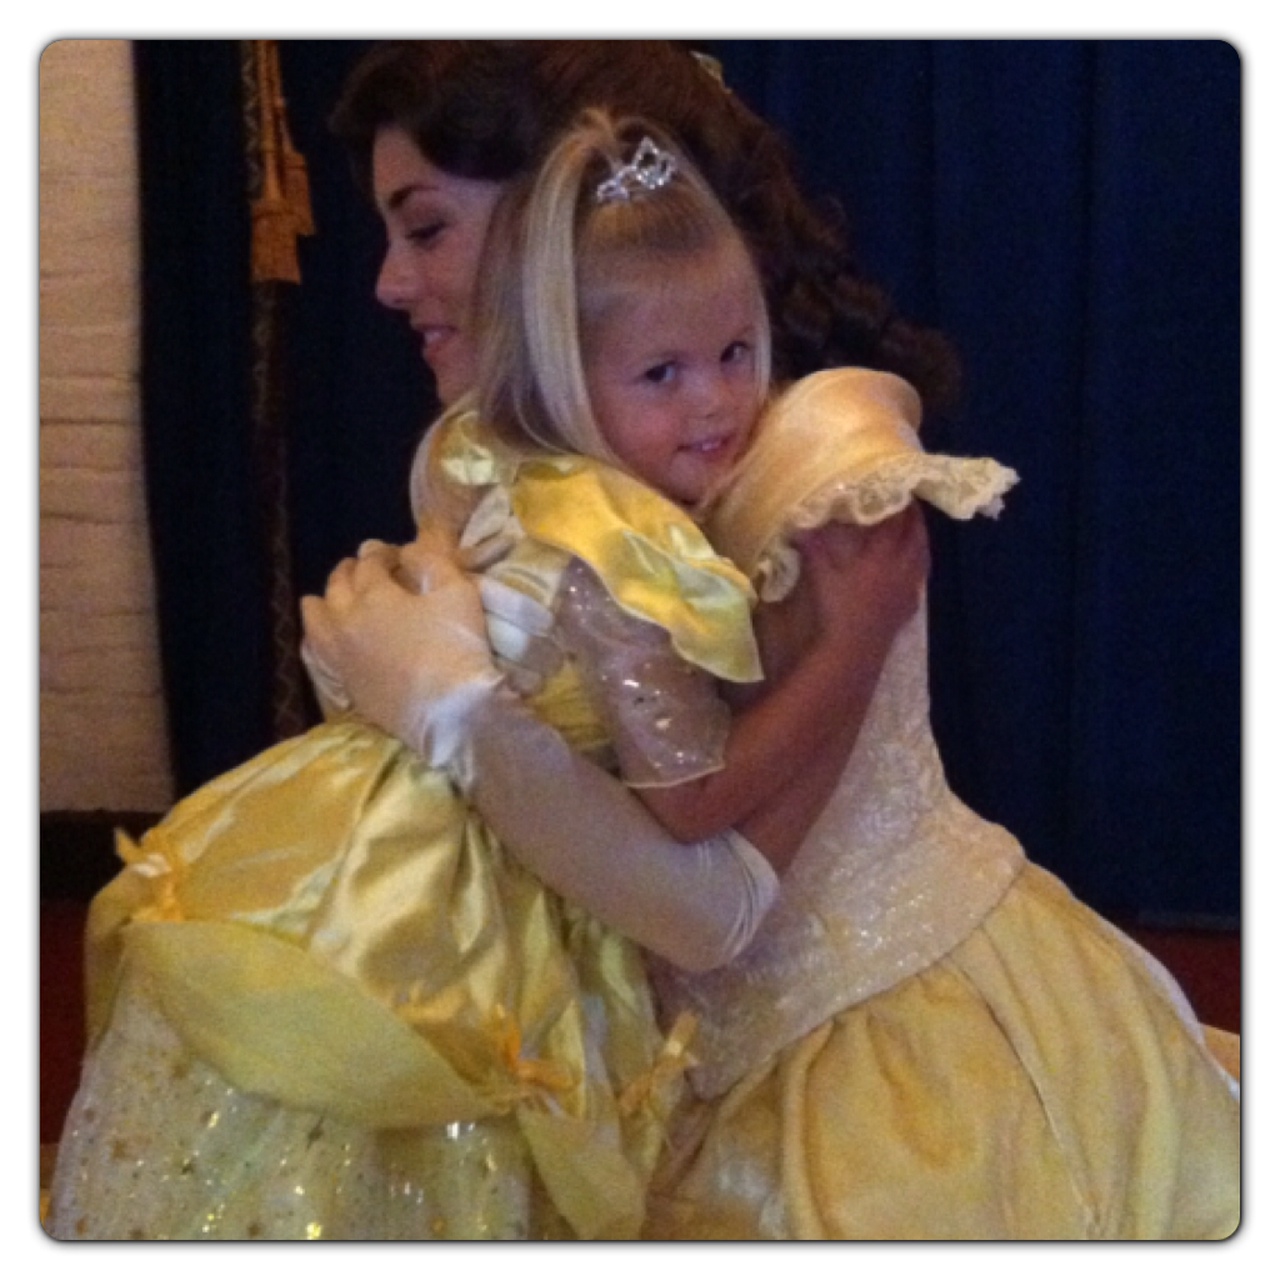
For 35 years I’ve cried at the end of each and every summer.  In my teenage years my parents would drive away from Chadwick Beach, New Jersey as I cried with sand still sticking to my toes.  This year, my 36th summer was far from any scene Norman Rockwell would have wanted to capture!  My kids seemed to take up sibling arguing as their summer hobby, my parent’s beach house at the Jersey Shore sat completely gutted and unusable thanks to last October’s hurricane, my son broke his arm, and as the lyrics of It’s a Small World say it best, our trip to Disney seemed to bring out “A world of tears” in my daughter!  TaNTrUmS, ScReAmInG,  and BrEaKdOwNs were everyday occurrences for my kids (and sometimes Mommy).  On our Disney vacation, the low-point was my daughter Abby while decked out head to toe in her Belle costume screaming at the top of her 4-year-old lungs, “You’re a mean Mommy!”  Why you might ask?  All because I wouldn’t let her walk on a ledge that she wanted to use as a balance beam!  MeAn MoMmY!!!  Where was this kid when her MeAn MoMmY was packing 3 princess dresses complete with tiaras and light up shoes, a Tinker Bell costume with light up wings and shoes that jingle, and countless other Disney “necessities”?!!!

Image (7)
This is just so you can get an image of the Belle ensemble!

Then the high-point.  If you’ve ever been to Disney World’s Hollywood Studios you know you can’t top the experience of ridding the Aerosmith Rock ‘n’ Roller Coaster.  I LOVE roller coasters and this one is simply the best.  You ride in the dark and go 0 to 60 mph in 2.8 seconds while Aerosmith’s LoVe In An EleVaToR and WaLK THiS WaY blast in your ears!  Since my kids were way too little to go on this ride and we had no one to watch the kids while my husband and I went on the ride.  I did the only thing that made sense.  I WENT ON THE RIDE ALL BY MYSELF.  I walked up the single riders line and was on the ride within 5 minutes.  As like each time I’ve gone on the Rock ‘n’ Coaster before, my heart was pounding with anticipation as the limousine coaster pulled back and took off into darkness.  Turning upside down and sideways with Aerosmith screaming in my ears was exactly what I needed to recharge and refuel.  I walked off that ride like a little kid on Christmas morning.  OK, so the ride  only lasts 1 minute and 22 seconds, but it was 1 minute and 22 seconds ALL TO MYSELF!  There was no fighting over who was going to sit next to Mommy, no crying when “World of tears Abby” was too short to go on the ride when Nicholas made the cut, it was just me and around these parts that is a ReAlLy rare thing!  I think there may have been a little skip in my step when I met my husband and kids waiting for me and when the next little crisis broke out…this Mommy was ready to take it on!tumblr_m8il1io18v1rq4chmo1_500

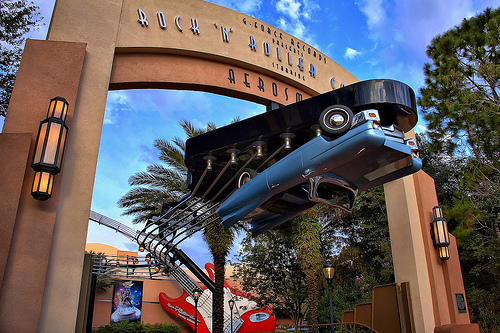
I realize that I can’t jump on a roller coaster every time I need to get some perspective, but this entire experience made me realize that it is the smallest and silliest things that can turn your day or summer in my case around.  If you feel like you are overwhelmed with something whether it be your kids, family, work, etc. take a break and do something that makes you happy.  Get your nails done, go shopping, grab coffee with a girlfriend.  It might be just what you need!

*Or you can click on this YouTube video I found that someone made of the Aerosmith Rock ‘n’ Roller Coaster.  It pretty much details my entire ride except they had a different music selection…still great though!

Experience the Rock ‘n’ Coaster!

Great to be back!

~Robyn (Jersey Girl)

How I Got My Kids To Stop Sucking Their Thumbs

Hi friends!  I missed you all this summer, more than you’ll ever know.  I underestimated how much writing YOU is such good therapy for ME! :)

At the beginning of the summer I decided to work on accomplishing one GoAL with the kids by the end of the summer: to stop their thumb sucking!!  It has been a habit for both of our kiddos ever since birth.

We purchased some (pricey) thumb guards from tguard.com which was recommended by a friend.  This worked well with Leanne, our oldest daughter who is 6.  thumbguardGarrett, our 3 year-old, didn’t respond as well to them.  No matter what I did, he seemed to find a way to get the guards off.  I even bought the next size down, thinking they were too big, but he still found a way.  Truly, I think he got them off because he was willing to put himself through a considerable amount of pain…that’s a BOY for ya!  But my daughter didn’t really fight it, and even if she tried, she wasn’t able to get hers off.  Regardless, I would still highly recommend tguards to anyone wanting to break this habit.  I think they are one of the best options on the market.

The next thing we tried was our ChEApEst and most successful attempt so far.  I took their winter mittens and cut out all the fingers except the thumbs!  Both kids responded well to these because they were more comfortable to wear and much easier to put on.  The issue with mittens: they are SUPER easy to take off, which meant we had to UP the incentives to keep them on.  So…if they took the mittens off during the night, they didn’t get chocolate milk for breakfast and had to choke down regular milk (ha!).  Also, they got points toward a favorite toy which they finally got to cash in at the end of the summer.  The chocolate milk was a good incentive because it is the first thing they look forward to when they wake up, which we always reminded them when putting them to bed.  Sometimes they would come into the kitchen with a frown on their face and mitten-free hands, knowing regular milk would be on the menu:(

DSC_0556It took about a month for Garrett to break the habit of taking his mittens off at night.  And even though I feel they have broken their habit, they still request the mittens at night, just to make sure they don’t suck their thumbs without realizing it while sleeping.  I am so proud of them!

As I re-read this post, the process still sounds so much easier than it really was.  I don’t want to lie and make it sound like it was easy, because it wasn’t.  It was a FigHt, especially with our 3-year-old.  We exhausted all incentives and thumb guard options out there, and by the second half of the summer the mittens seemed to be what was most effective (even though it still took a good month before I felt like they really had it mastered).  It was a roller coaster of a summer, but worth all the hard work!  If your kiddos are dealing with the same struggle, I hope our experience and the mittens/tguards can be new options for you! Don’t lose hope! Hang in there momma!

Good Luck!

Lara

Declutter Your Life

In the last month or so I have made a lot of ChaNgeS in my life.  First off, I recently had another garage sale which proved to be just as successful as the one in the fall.  I finally have a clutter free home.  I made a point to go through EVERYTHING, and if I didn’t LOVE IT, I sold it.  There were things that were hard to get rid of, mainly due to habit and feeling like I “had” to keep it around the house “just in case”.  Let me tell ya, it was worth it because everything is organized and I can keep better tabs on what we need and what we don’t. declutter-wordle1

Once I was able to declutter my home, it was only natural to want to DecLutteR other areas of my life.  Several weeks ago, Robyn wrote a post called iPhone Mommy.  It struck a chord with me.  For months I had been feeling like the internet and social media were a huge distraction and temptation.  I wish I was like those of you that are disciplined when it comes to social media, but I am not.  I kept making excuses that I HAD to check my facebook several times a day to make sure I wasn’t missing personal messages or notifications from groups I am involved in.  Robyn’s post motivated me to make some cHaNgeS once and for all.  I tied up lose ends with my personal FB messages and notified leaders to any of my groups.  I told these people that I wouldn’t be checking facebook as often and to contact me via email or phone if they needed something right away.  Everyone has been very understanding and I guess I figured if someone needed me bad enough, they could find a way.  It was really that simple!  Now, I only check facebook once every couple of weeks, which allows me to catch up on information or messages I may have missed!

To take things one step further, I changed the settings on my phone so I no longer get an email “ring” for new emails AND I deleted the facebook icon so I’m not tempted to check it.  This has made a huge difference when I am around my kids.  My phone isn’t dinging all the time and we spend more quality time together in random places.  When we use to wait in the car I would sit there and read the internet while they were in the backseat.  Now we try to play games or talk about fun stuff!  In addition, if we are playing and the phone rings, I don’t answer when I feel like the kids are really engaged in what we are doing.  Several times they’ve asked, “Mom, aren’t you going to get the phone?” and I say, “No, I want to play with you right now.”  The look and smile on their faces when I say that….PRICELESS :)

Last but not least, I am writing to say that Robynn, Robyn (Jersey Girl) and I are going to take the summer off in regards to blog posting.  We don’t want to give it up for good because we really enjoy writing and sHaRinG things with you.  But, like we talk about so often, if it doesn’t bring you PEACE then you need to make some changes.  Now that the kids are going to be home all summer we feel that not being tied to anything (a.k.a the blog) will bring us the most peace.  We know you understand, and we thank you for that.  The plan is to pick up in September once kiddos are back in the grind of school.  I didn’t even put a dent in my “Home Makeover Series” so I hope to share more of that with you, along with the normal LIFE posts that I share.

I hope that this lengthy (sorry! *wink*) post has encouraged you to declutter areas in your own life.  I cannot tell you how much jOy and fReedoM it has brought to mine.

Have a wonderful and memorable summer and we look forward to writing in the fall!

Cheers,

Lara

Kitchen Makeover: Backsplash, Shelving and More Painting!

Now for the pictures that you have been WaiTinG for!  As I worked on painting the cabinets, I also added open shelving.  Check it out!DSC_0399

DSC_0398

DSC_0397

DSC_0393

I bought the corbels at Home Depot and used MDF board for the shelves.  Next, I added a wainscoting backsplash, which I don’t have ANY pictures of that process (sorry!).  But, I do have pictures of the nearly finished kitchen at Christmas!

Just for dramatic effect, let’s see where’ we’ve come from the beginning…

BEFORE
BEFORE

Here is an “after” picture (as of December 2012)!

After 2

We added a new light fixture above the sink and painted the trim around the window.  The trim, shelves, corbels and backsplash are all the same color.  I used white trim paint from Sherwin-Williams.

After 1

Here is a “before” from the right side of the room.  Remember how I said I was going to build a cabinet to hide the range hood pipe?  (where the greenery is in the picture below)

DSC_0255

Well here it is!

After 3

I took a cabinet door from a “lazy susan” cabinet that I bought on Craigslist.  I cut the cabinet door down to size, and hung it.  It opens from the bottom (the hinges are on the inside top) but I LOvE that it gives us extra storage space!  The other big changes on this side of the room is a new fridge and range hood!  I also added wainscoting to the back of the open cabinets (the one with the microwave and the cabinet above it).  This really prettied them up :)  What do ya think?!

After 4

These pictures pretty much bring you up-to-date on how my kitchen looks today.  We recently replaced the light in the kitchen ceiling and put in recessed lighting.  We also finished taking off the popcorn ceiling and now have a “knockdown” texture on the ceiling.  It looks so much BeTTeR!  All I have left to do is paint the ceiling (white) and add crown moulding to the top of the cabinets.  We eventually need to switch out our kitchen sink and replace the countertops (since those are the ones I painted 5 years ago!) but I am so indecisive on what I want…so it could be a while :)

My kiddos are officially on sUmMer bReaK, so who knows when I will finish up the kitchen!  We are so close though, and I am thrilled with the results!  It has really opened up the space and feels like we doubled our cabinet space since we added the open shelving. Gotta love that!

Let me know what you thought of the kitchen makeover!

Cheers,

Lara

Are You Prayin’ About It?

Last night I was lying in bed thinking about a couple of things.  This was sMaLL stuff–you know–like how I was going to get everything done this week, if I had enough activities planned for the kids this summer, and if I was going to get the stain out of those tan pants :-/

All of a sudden, “Are you praying about it?” popped in my head.  For a second I pushed the thought away because I thought it was silly to pray about such minor things.  But then I remembered how Jesus wants us to talk to Him, no matter how great or small the worry may be.

praying hands

Are you worried about something?  Fretting over, what to most people, may seem like a silly little thing?  If it is a worry in your heart, then Jesus isn’t laughing.  Talk to Him.  Share your concerns and allow Him to CaRRy your load.  I am sure even He wouldn’t mind carrying a small load every once in a while :)

May Peace Be With You,

Lara

Kitchen Makeover: Painting!

Now for the fun stuff!!  I painted the lower cabinets “Mourning Dove” by Martha Stewart.  I had it mixed at Sherwin Williams, and since it is a discontinued color, just ask them and they can find the formula and mix it up for you!

2

I decided to add some FuN to the room by adding chalkboard paint on the back wall.  I love it!  And so do the kids!!

Picture1

Picture4

Remember this cabinet?  This is the first cabinet I removed when I started the kitchen makeover!

7a

And here it is painted!

7

To this day, I am still debating if I like the distressed look (see the left cabinet door below) or if I want the cabinets to be solid white (see right cabinet door below).  What do you think?

8

The upper cabinets were painted Alabaster by Sherwin Williams.  6

5

I never shared with you the picture of the ceiling after I ripped out the soffit.  Here it is!  The ceiling also shows were I started taking off the popcorn ceiling.  Yep…I opened that can of worms and will share that process with you later.  I can assure you, all the mess and work was well worth it ;)

9

So just to see where we’ve come, here is a “before” of the left side:

BEFORE

And here is a “during” of the left side:

Picture4

Here is a “before” picture of the right side of the kitchen:

DSC_0168And here is “during” the painting process of the right side!

10

Stay tuned!  Next week I am going to share pictures of the backsplash, open shelving, and the rest of the painted cabinets!!

Cheers!

Lara

Honoring Teachers, Nurses, and Mothers!

It just occurred to me that this week we are celebrating three of my favorite professions…NuRsEs, TeAcHeRs, and MotHeRs!  Having been a first grade teacher for the 8 years prior to having my children I know how teaching can sometimes seem like a thankless job.  There are MaNy parents who go out of their way to let you know that they appreciate the difference you are making in their child’s life.  BUT…for every parent that thanks you there are 5 that say nothing and 5 that do nothing but complain about what you are NoT doing for their child!  I saved every card and thank you that was ever given to me by a parent or student and now being a parent myself know how important it is to simply say…ThAnK YoU!

ba81ff15297478e9205921abc2b994c9

Next up…Nurses!  I have to say up until my late 20’s I had little experience with nurses.  I never broke a bone or needed surgery and had no reason to visit a hospital.  I guess I saved up my need for nurses for the grueling 2+ year struggle with infertility and then my 2 time bought with postpartum depression.  There is No WaY I would have made it through both of these experiences without the support of the nurses who took care of me during these times.  When going through my 3 IVF cycles, it was truly the nurses, not the doctors who knew my story.  I saw the doctors every morning on a rotating basis, but it was my nurses Mary and Pat who were my true cheerleaders.  They cried with me through the disappointments and were on the phone with me when I found out I was expecting my miracle baby.  It takes a SpEcIaL kind of person to be nurse and share in the highs and lows that come with the fragile life we are given.  To all of you…ThAnK YoU for all you do!

51d4e5614089328ebacede0e6e351d2a

Finally…a huge thank you to all of the MoThErS, AuNts, and GrAnDmAs!  For years I dreamed of having a baby and being a stay-at-home mom.  I am not sure what exactly I thought I was getting into, but I can remember saying a few times in the very beginning, “Where are the cute baby bunnies and little yellow duckies?!!!”  Baby gifts and baby cards always have cute little animals on them with cheerful little expressions…there have been MaNy a day that our house looks like a bull ran through a china shop and I have yet to see those cute animal faces!  That being said, I believe that being a mother is the hardest JoB in the world.  Every single decision you make directly affects those you hold so dear.  I wish all of you a VeRy HaPpY MoThErS DaY!

!BZQn3U!!2k~$(KGrHgoOKigEjlLm,etkBKl)tRL8Lw~~_12

~Robyn (Jersey Girl)

Kitchen Makeover: Tearing Out MORE Soffit

Last week I shared with you how I tore out the soffit and raised the cabinets on one side of the kitchen.  Was Doug surprised when he came home?!  To be honest, he wasn’t as ShOcKeD as I anticipated.  In his defense, it is a “norm” for me to take on projects, and for some reason I get itchin’ to do it when he is gone.  Serves as good motivation to surprise him I guess ;)  The AWESOME thing is that he is extremely supportive of my love for this type of work, but under one condition….that I don’t drag him into helping me all the time ;)

…But every now and then I give him that puppy dog face that he can’t resist, and he becomes my partner in crime!  Which is why I want to share with you how much easier and faster it was to raise the cabinets on the other side of the kitchen!

I obviously was so tickled when Doug agreed to help me that I didn’t take NEAR as many pictures of the pRoCeSs!  In fact, due to having a helper this time around we were able to demo the soffit, raise cabinets and finish the left side of the kitchen (below) in 2 hours!  That’s right…2 hours!  To get started, here is a before picture:

shoup house 3

Same process, just much faster with two people!  (for more details instructions, visit Kitchen Makeover: Raising Cabinets)

2 Score Sheetrock

3 Tear off Sheetrock

4

5

As you can see below, we threw plastic over the stove and counters for easy cleanup.  I learned my lesson after doing the demo without it last time ;)

6

We raised the cabinet on the end first (as the white rectangle BELOW shows where the cabinet use to be).  This made raising the cabinets a breeze because all we had to do is go straight up.  Didn’t have to worry about keeping them level because they stayed flush to the cabinet next to it!  We just worked our way across the kitchen, unscrewing and raising one cabinet at a time.  We also didn’t mess with taking the food out of all the cabinets at the same time.  With each cabinet we moved, we took out the food, raised it, and then put everything back.  Super easy!

7

Notice the cabinet above the stove in the picture below.  We didn’t raise this cabinet to avoid messing with the range hood and exhaust vent.  I decided I would eventually make a new cabinet and door which would maximize our storage space and hide the pipe!  You’ll get to see how that turned out in a future post!

8

To recap, here is a BEFORE picture of the left side of the kitchen (that I took a few years ago!)

shoup house 3

And here it is AFTER!  10

The cabinet above the stove is the only one that stayed where it was originally.  And in the meantime I tried to make the exhaust pipe “pretty” by throwing a plant up there Ü

One more thing, notice the 2 small cabinet doors above the microwave…

shoup house 3

…and then how I removed them in this “after” picture.  I think I am digging the idea of open shelving ;)  And speaking of shelving, see all that extra wall space we created by raising the cabinets?  Stay tuned for pictures on how it looked once we added open shelving under all of the raised cabinets!

9

We did It! (**I couldn’t help but do the Dora song and dance**) What a great project for a Saturday morning.  Tackled it right after breakfast and we were done by lunch!  I wish all projects were that quick.

Next week I hope to share the different changes I made in the kitchen by PAINTING!  Here is a sneak peek…2Have a good weekend!

~Lara

Kitchen Makeover: Raising Cabinets

For those of you that have patiently waited…the time has FiNaLLy come!  I am starting my Home Makeover Series today, beginning with my kitchen makeover!!  If you remember, last April we began preparing our house to have it MOVED 100+ miles.  It was during that time that I probably lost my mind for good Ü

The same month that we tore off our old mudroom in preparation for the move (which use to be where the door/clock/purses hang in the picture below) I decided if I already had a demo pile of trash outside, I might as well add to it by tearing out the soffit in my kitchen!  Here is what my kitchen looked like 12 month ago….Demo before

Kitchen Before
KITCHEN BEFORE

Believe it or not, one morning I decided I had lived with this soffit long enough…and I knew Doug would be gone for 24 hours so he couldn’t talk me out of it…so at 10:30 a.m. this is what I did:

Step #1: Cut Hole
Step #1: CUT SMALL HOLE in soffit to see what you are getting yourself into.  Luckily, our soffit was hollow!!
Step 2: Score Your Sheetrock
Step 2: SCORE YOUR SHEETROCK from the ceiling so you have a clean cut when you pull out your soffit.  This will keep you from tearing up your ceiling!
Step 3: Rip Our Soffit!
Step 3: RIP OFF THE SHEETROCK!
Step 4: Keep Ripping!!
Step 4: KEEP GOING!! DON’T GIVE UP!

After I made it halfway across the kitchen, I removed the first cabinet (as you can see in the picture below, the white area is where the cabinet was).  Moving the cabinets would allow me to rip out the rest of the soffit AND keep the cabinets safe from demo!

Step 5: Remove Cabinet

How did I do it ALONE, you ask?  Well, since my kids were too little to recruit AND cabinets are HEAVY, I had to get creative Ü  I flipped one of our barstools on its side, wedged towels in-between the cabinet and stool, then held the cabinet in place as I unscrewed the screws with the electric screwdriver.  Once I got my balance, I carefully took them off the stool and placed them in a safe spot.

Support Your Cabinets if Lowering Them By Yourself
Step 5: SUPPORT YOUR CABINETS before removing

The idea was working, until I got a too CrAzY and wedged the stool so tight that I couldn’t get IT or the cabinet loose!  So…I ended up having to take the barstool apart. :(  But no worries!  I screwed it back together and it is just like new!!

Demo 1

Once the cabinets were out of the way, I started pulling out the studs.  Some of the studs were hard for me to remove due to really big nails securing the studs.  I used a sawzall and cut most of the studs, then used a crowbar to remove them.  Yes, I did make some pretty obvious gashes in the sheetrock.  We’ll worry about that later ;)

Step 6: Remove other Cabinets
Step 6: REMOVE remainder of cabinets and CONTINUE TO DEMO SOFFIT!

In the picture below, see how the soffit comes out to the middle of the room?  I removed this cabinet and took it out for good!  I knew doing so would really open up the space!  (And as far as giving up a cabinet and loosing the extra space, I have a solution for that in a future post!)

demo 3

Don’t you agree?  Look at how much it opened the room!

Step 7: Find Studs and Rehang Cabinets
Step 7: FIND STUDS and REHANG CABINETS

I thought I took pictures on how I hung the cabinets by myself, but apparently I was getting tired by that point!  The picture above shows the first cabinet I hung.  As you can see, I purposely left a gap between the cabinet and ceiling so I could add crown moulding in the future.

The idea of hanging the cabinets was pretty easy because all I was doing was moving them straight UP.  The screws could stay in the cabinet holes because I would still hit a stud.  The hardest part was doing this alone and having the strength to hold the cabinet exactly where it needed to be AND screw in the screws at the same time.  I used the barstool and towels again, and to make sure the cabinet was level, I taped it to the top of the cabinet so I could see if it was level or not!  My body is sore just thinking about this step of the process.  It was quite the workout, but I finished!!

10 hours later I had cleaned up the demo pile, tossed it outside, and got to enjoy the fruits of my labor.  Here is what the kitchen looked like at 10 A.M.:

Kitchen Before
KITCHEN BEFORE

And here it was at 8:00 p.m. (I took some of the cabinet doors off because I wanted to see if I liked open shelving):

Step 8: Done by Evening!
KITCHEN AFTER

Ya think Doug noticed when he came home the next morning??? :)

If you want me to continue “Lara’s Home Makeover Series” comment below by telling me what you think of this kitchen project!

Cheers~
Lara

iPhone Mommy

I admit it…I spend WaY ToO MuCh time on my phone.  It is a habit I have been saying I am going to stop for a long time, but have yet to accomplish.  It would be bad enough if I was taking time away from my kids by just talking on the phone, but we all know that is not what I am doing.  I hop around from email, to Facebook, to Pinterest, to Twitter and sometimes throw in a game of skee-ball.  The problem is…NoNe of this is more important than my kids!  If you are hooked  on your phone and have been trying to stop, this letter written by Tonya Ferguson on her blog 4 Little Fergusons might just be what you need to finally put it down.

537429_4795292767849_513479553_n

Dear mom on the iPhone,

I see you over there on the bench, messing on your iPhone. It feels good to relax a little while your kids have fun in the sunshine, doesn’t it? You are doing a great job with your kids: You work hard, you teach them manners, have them do their chores.

But Momma, let me tell you what you don’t see right now …

Your little girl is spinning round and round, making her dress twirl. She is such a little beauty queen already, the sun shining behind her long hair. She keeps glancing your way to see if you are watching her.

You aren’t.

Your little boy keeps shouting, “Mom, MOM watch this!” I see you acknowledge him, barely glancing his way.

He sees that too. His shoulders slump, but only for a moment, as he finds the next cool thing to do.

Now you are pushing your baby in the swing. She loves it! Cooing and smiling with every push. You don’t see her though, do you? Your head is bent, your eyes on your phone as you absently push her swing.

Talk to her. Tell her about the clouds, Mommy. The Creator who made them. Tickle her tummy when she comes near you, and enjoy that baby belly laugh that leaves far too quickly.

Put your eyes back on your prize: your kids.

Show them that they are the priority. Wherever you are, be ALL there. I am not saying it’s not OK to check in on your phone, but it’s a time-sucker: User beware!

Play time at the park will be over before you know it.

The childhood of your children will be gone before you know it.

They won’t always want to come to the park with you, Mommy. They won’t always spin and twirl to make their new dress swish. They won’t always call out, “WATCH ME!”

There will come a point when they stop trying, stop calling your name, stop bothering to interrupt your phone time.

Because they know …

You’ve shown them, all these moments, that the phone is more important than they are. They see you looking at it at while waiting to pick up brother from school, during playtime, at the dinner table, at bedtime.

I know that’s not true, Mommy.

I know your heart says differently.

But your kids can’t hear your words, Mommy. Your actions are screaming way too loudly.

May our eyes rest upon those we love, first and foremost, and may everything else fall away in the wonderful, noisy, sticky-fingered glory of it all.

*********************************************

~Robyn (Jersey Girl)